It’s been a while, but here’s Part 3! 😀
In Part 2, I came up with a rough plan for my game, and prototyped a workflow for creating sprite graphics, importing them into a generic 2D level editor called Tiled, and parsing the tilemap data into game sprites that I was able to draw into the window.
In this part, I’ll be getting down to lots of coding, focusing mainly on getting player movement and collisions done well*.
Check out the full game development series so far here: Game Dev.
Visual Studio and project structure
Before pressing on, something had been bothering me that I wanted to resolve. Every new file that Visual Studio created for my game classes ended up in a flat folder structure looking like this:
VioletVoid/├─ Engine.cpp├─ Engine.h├─ Level.cpp├─ Level.h├─ README.md├─ VioletVoid.cpp├─ VioletVoid.vcxproj├─ ...etcEvery file just ended up in the root, making it a big eyesore and difficult to grok through from the filesystem perspective. What I’d really like is all my working files (.cpp, .h) to be inside a src child directory. This sounds simple, but it’s not a simple thing to achieve in VS without breaking the compilation! It’s because VS needs to track every file’s location relative to the project configuration. This can be changed by editing the project config to prefix file names with src/, but that’s manually done for every file. It’s crazy to me that VS doesn’t appear to offer a simple way of automatically managing/discovering linked source file locations.
Whilst there’s (ugly) workarounds, I bit the bullet and decided to just manually change file locations. My project config looked like this in the end:
<Project> <!-- etc.. --> <ItemGroup> <ClCompile Include="src/Engine.cpp" /> <ClCompile Include="src/Entity.cpp" /> <ClCompile Include="src/Level.cpp" /> <ClCompile Include="src/Tile.cpp" /> <ClCompile Include="src/VioletVoid.cpp" /> </ItemGroup> <ItemGroup> <ClInclude Include="src/Engine.h" /> <ClInclude Include="src/Entity.h" /> <ClInclude Include="src/Level.h" /> <ClInclude Include="src/Tile.h" /> </ItemGroup></Project>Moving swiftly on!
Implementing an SFML View
I’ve mentioned a couple of times that SFML has a View class, which provides great control over what’s displayed in the game window. Initially, I expected a View to act like a group for sprites so that they can be positioned relative to the group, but it’s actually more like a camera. Imagine having a 2D map of 1000 tiles.
Here’s a visual example, showing how a level may cover a huge surface area, but the View may just focus on a portion of it to display.

Like Sprites, Views can be manipulated by changing their position, rotation and scale, so you can imagine a view being used to pan around a large map based on the player’s position.
Creating a view is done with a single line of code, telling it which area of the graphics it should focus on. I did this and assigned it to my engine’s window via .setView(view). I got a black screen, which I’d expected, because I hadn’t correctly set where the view should focus on.
I also needed to consider how the view will actually be positioned in the final game. By default, I want my view to focus on the player. I lost my previously created Player class because I started a new project in Part 2, so I recreated it with the bare minimum position x and y values being stored. I think it’s a good idea for the level to store the player start position, which can tell the Player where to initialise itself, and then in turn set the view’s position to focus on.
The process of setting the View position based on the Player will of course need to keep happening for every frame to ensure the game always shows what it’s supposed to. I could get fancy down the line with focusing the view on different aspects like cutscenes, but this was a good enough start.
Correcting the view aspect ratio
I tried initially using a 64x64 sized View starting from the top left of the level, and ended up with this:
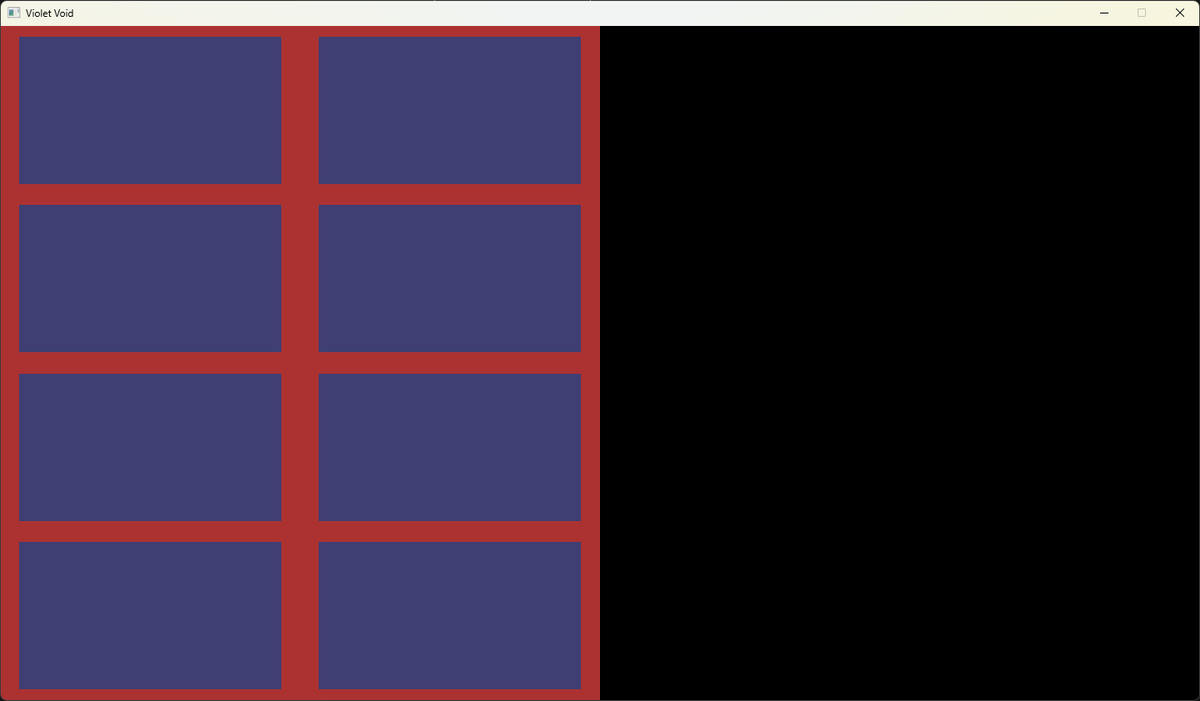
Ignore the number of purple tiles - this whole window is showing a 2x2 grid of tiles (each is 32 pixels squared), but they are stretched out horizontally because the window is not square and the view is trying to display a square ratio. Therefore, I needed to factor in the aspect ratio of the window when setting up the View.
Luckily, I already had the exact aspect ratio because I created it at the start to set the window size:
class Engine{private: float windowRatio = 16.f / 9.f; // 16:9I just needed to reference this when creating the view, using it to scale the width. With a height of 64px, the width ended up being 113.777px. The result was that my square tiles displayed correctly, cut off by the edge of the window:

The key here is that you set the number of pixels in width and height that the view should focus on, and it’ll automatically scale that up to the size of the window. You can also tell the view to only draw over part of the window, so I could see this being useful for displaying a mini-map in the corner of the window.
Smoothing out player movement
In my previous player movement code, I simply set a new position based on the current position plus/minus a fixed amount when a button was pressed.
Here it is again with the old background texture:
There’s two issues I had with this:
- No acceleration/deceleration, so movement is instantaneous
- Stuttering of the player movement because it’s not updating the player position on every frame, but only when the keypress event is detected (which varies based on OS and other factors)
Fixing both of these meant completely redoing how key presses were tracked, and how position was updated.
Fixing key press tracking
I needed the player to maintain the state of whether it was moving up/left/down/right. I simply added Boolean flags for each of these:
class Player{private: bool movingUp = false; bool movingDown = false; bool movingLeft = false; bool movingRight = false; sf::Vector2f velocity;Perhaps there’s a more elegant way of storing these, but this makes the values quick and easy to access. I also added a velocity vector to track the current x and y velocities. This will be important later.
Now, when a key is pressed, I set the appropriate member variable to true. When a key is released, I set it back to false. For example, back in my Engine class:
case sf::Event::KeyPressed:  if (ev.key.code == sf::Keyboard::A)    this->player.startMoving(PlayerDirection::left); // player.movingLeft = true  break;
case sf::Event::KeyReleased:  if (ev.key.code == sf::Keyboard::A)    this->player.stopMoving(PlayerDirection::left); // player.movingLeft = false  break;
This is the correct way to handle holding down keys, because it uses both key press and release, and the state is decoupled from the event by storing it in the player object. I excluded any logic pertaining to actually updating the player’s position from these methods, so their sole function is to update the appropriate state and nothing more.
Smoothing positional updates
Next, I added a new method processNextMove() that the Engine can call before redrawing the player sprite. This method is responsible for checking if any movement directions are set to true, and updating the player’s velocity as needed. Once the new velocities in x and y are calculated, they get used to update the player sprite position with a simple: position += velocity.
It was important for me to also incorporate acceleration and deceleration, so this also got added into the same set of calculations. I incremented/decremented the velocity every time processNextMove() got called until a baseMaxSpeed value was reached to prevent the player getting infinitely faster, which was very simple to implement with the min/max math functions:
float x = std::max(baseMaxSpeed, position.x + velocity.x);Fixing diagonal velocities
Whilst the above code worked nicely, it updated x and y velocities independently, so when two adjacent directions were pressed (e.g., up and right), the 2 axial velocities combined and the player moved faster than baseMaxSpeed. Some old games have this bug, too! It’s something speedrunners use/abuse to complete games faster by forcing the player to move faster (strafe-running). I’m not against this necessarily, but I think it’s more natural-looking to limit velocity in any direction to a fixed maximum value.
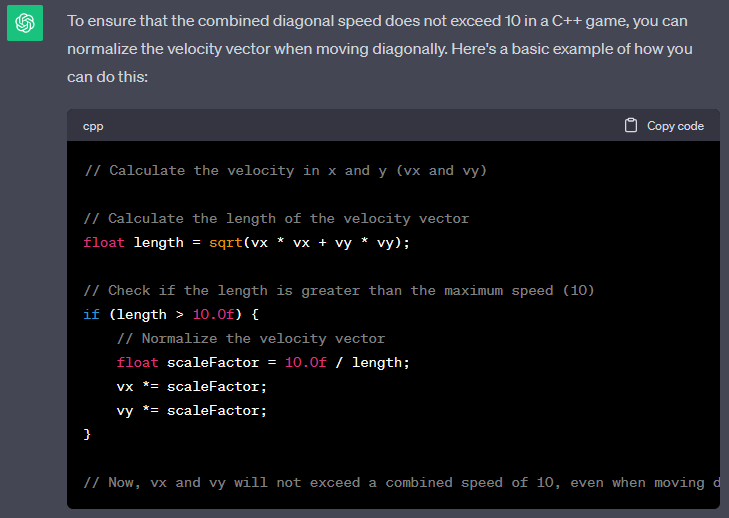
Happily, I didn’t have to rewrite any of my above code to fix this bug. I simply needed to add a check after the x and y velocities get calculated to adjust the values and prevent them exceeding the maximum.
ChatGPT to the rescue!
With this bug fixed, and after remembering to center the player sprite’s origin, I had some nice fluid player movement, with the SFML view tracking the player perfectly!
I dropped the player direction change when it moves left as I intend to redo it in a way that will work with sprite animation.
Also, more jarringly, there’s no collision detection with the walls (or anything else for that matter), but it’s progress!
Some gotchas & lessons learned
In working on the above, I increased my knowledge of working with C++ and SFML dramatically, and unearthed a couple of lessons I’d like to share about both.
C++ class constructors
In most examples of C++ code you’ll see class initialisation like this:
MyClass myObject;My (usual) JavaScript brain found this extremely odd! Where is the = assignment? Where are the brackets? Where’s the new keyword?
The above code is simply calling the default constructor of a class and assigning it to a variable in just two words. Short and sweet.
The same applies when you assign a member variable to a class, e.g.:
class Engine{private: MyClass myObject;}This code automatically initialises MyClass by its default constructor when Engine is initialised.
I didn’t realise this at first, and I was getting frustrated, because I thought I was only ever initialising MyClass in some explicit code here:
Engine::Engine(){ this->myObject = MyClass("hello!");}This is the default constructor of Engine. It looks like I’m explicitly creating MyClass and passing the string "hello", which is true - that’s what’s happening. However, it’s also initialising MyClass using its default constructor before this because of the way Engine defines myObject in the class definition (in the previous code example).
The solution is to use a member initializer list. It looks like this:
Engine::Engine() : myObject("hello!"){}This overrides the definition inside Engine, which was this: MyClass myObject , so the default constructor of MyClass doesn’t get called.
In short: if you don’t provide an initializer for a member in the list, its default constructor is called (if it has one).
SFML and “white sprites”
SFML’s been great to work with so far, but I regularly hit issues where my sprites display as white boxes instead of the textures that I expected to be set.
There’s an official bit in the documentation covering this, and in summary it’s because the sf::Sprite only stores a reference to the texture it needs, not a copy of the texture. That makes sense - you wouldn’t expect your game to keep more than a single copy of each texture image file in memory.
The catch here is you need to know what you’re doing when creating and storing textures in memory. I didn’t know what I was doing (obviously).
I usually had this problem after refactoring code into new classes, putting more layers of abstraction between the main window and my classes. A prime example (and one that took me far too long to debug) was having a SpriteSheet class that I wanted to store a texture and sprite inside. This needed to be created and used by my Player class, which in turn the Engine class created. So a minimum here of 3 layers.
Specifically, I had a hard-to-find issue because I misunderstood when the default constructors were getting called (see my other “aside” above about that). My SpriteSheet class, which was storing the texture and sprite, was being created in the Player class… twice. Accidentally. With my new knowledge of initialisation lists, I was able to fix this by ensuring the SpriteSheet was only created once and passed by reference to the Player class, like this:
class Player{private:  SpriteSheet idleSpriteSheet;  // other members...}
Player::Player() :  // Create the sprite sheet ONCE with the intended params:  idleSpriteSheet("assets/sprites/player/Idle.png", 4, 10),{  // rest of the constructor...}
This now works as intended, initialising SpriteSheet once, and with its logic in the custom constructor, it’s able to load the texture into a sprite object stored inside the spritesheet instance.
In summary, here’s a checklist for others and my future self for debugging the dreaded white box sprite issue:
- Check where and how the texture is being stored
- Ensure the sprite has continual access to the location where the texture is stored
- Try not to create new instances of the parent class in the same variable as SFML may not fully remove old references to sprites and textures
Let’s leave it there (for now)
I’m acutely aware there’s a big gap between this and the previous article. I’ve had a few messages (well, two) and friends asking if I’m still working on this game. The answer is: yes! Sort of!
I started a new role at the end of last year and I’ve been putting a lot of myself into that, plus balancing work/life. Oh, and I picked up Starfield. Say what you want, that beast is such a time sink and I think I’m addicted and I NEED HELP.
Anyway, I’ve recently had that itch to get back into building my game again. 90% of this article I wrote 6 months ago, along with the code. I haven’t actually gone back to that code recently, but I’ve been exploring another avenue, which I’ll talk about in a near future article to keep this series going.
I’ll end by saying: this blog is moving to britrunner.xyz! A new domain and a complete ground-up refresh. Cya over there! And if you’re already here, hi! 🙋♂️